Export Your Leads & Add Them to PropertyPulse
Please select your email browser from the list below for step-by-step instructions on how to export your leads to a Comma Separated Value (CSV) file. Once exported, scroll down to the bottom of this page and upload your CSV. Please allow 24-48 business hours for leads to be imported, we will email when the work is done.
It is important that you export every lead as everyone is potentially a buyer or seller. Then, once the CSV is imported into PropertyPulse, you will be able to classify your leads.
For assistance please contact us by email at CustomerService@Z57.com
All trademarks are the property of their respective owner. Z57 is in no way affiliated with the companies and their products cited on this page.
- From the main menu, select File > Import/Export Leads > Export
- Choose Comma Separated Values (Windows) as the file type
- Select “Contacts” for all contacts
- Save exported file
- In the upper left corner, select “People”
- Click “Manage” at the top of the screen
- Select “Export” from the drop down menu
- Make sure you have CSV selected as your export file type
- Save the file to your computer
- Click “Mail” at the top of the page and select “Contacts” from the drop down menu
- Click on “More” at the top of the page and select “Export”
- Choose which contacts you’d like to export
- Select CSV as the file format for your export
- Click “Export”
- Choose “Save to Disk” then click OK
- Select location to save your file and click OK
——————-OR—————–
1. Navigate to the Leads tab

2. On the left side menu, click on Import Email Contacts

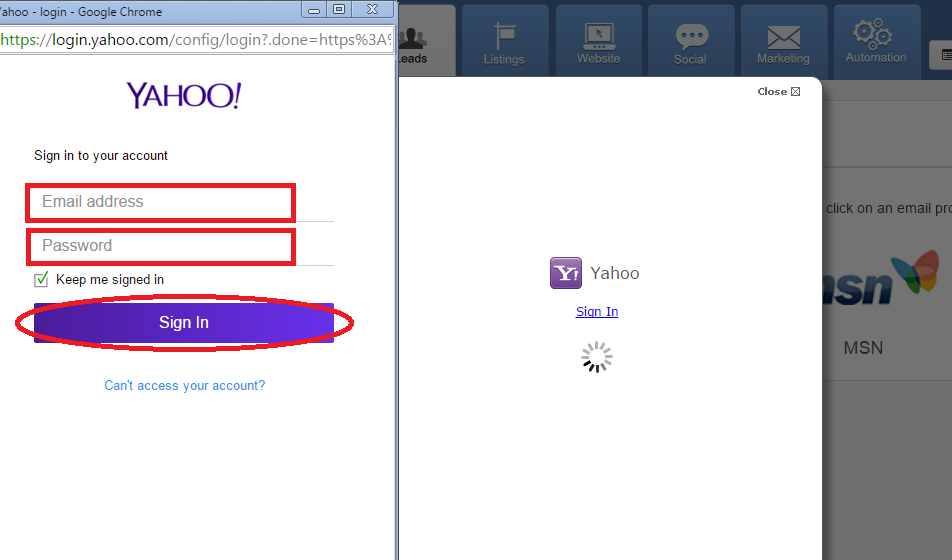
3. Click on your email provider

4. Enter your email address and password, then click Sign In
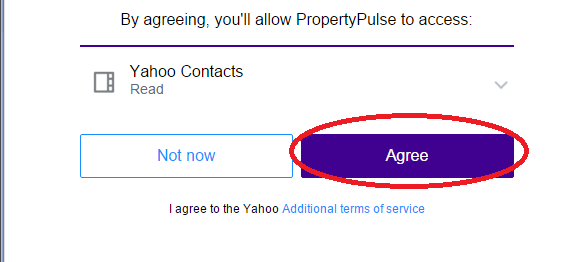
5. Allow PropertyPulse permissions to your email contacts by clicking Agree
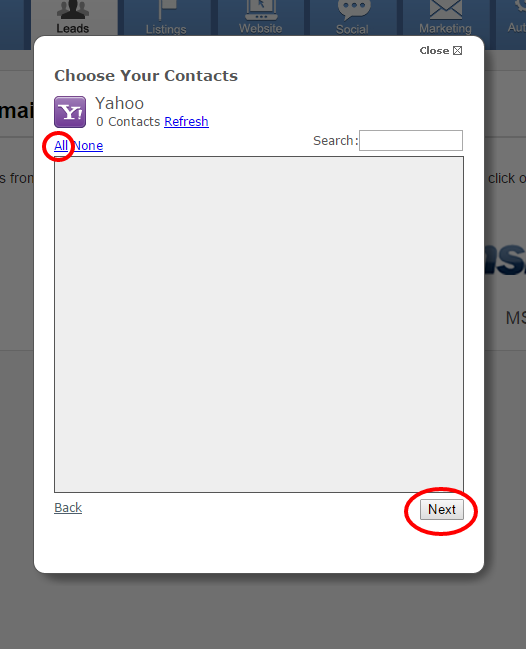
6. Select which contacts to import and click Next
- On your Yahoo! Mail page, click on “Contacts” on the left side of the screen
- Check the box next to the name of each contact you wish to export – if you would like to export all contact do not mark any boxes
- Click the “Actions” button above your list of contacts then select “Export”
- Save file
——————-OR—————–
1. Navigate to the Leads tab
2. On the left side menu, click on Import Email Contacts
3. Click on your email provider
4. Enter your email address and password, then click Sign In
5. Allow PropertyPulse permissions to your email contacts by clicking Agree
6. Select which contacts to import and click Next
- Click the “Contacts” tab
- Click “Print View”
- Align the cursor with the first letter of the first name in the name column
- Highlight your contacts by holding down the cursor and dragging it down the list
- Right click on the highlighted list and select “Copy”
- Open Microsoft Excel (or a similar spreadsheet program that supports comma separated values)
- Select cell A1 in Excel (the top square on the left side)
- Right click in the cell and select “Paste” (do not use ‘Paste Special’)
- Choose “Save As” from the File menu, and select the type CSV (Comma delimited)
——————-OR—————–
1. Navigate to the Leads tab
2. On the left side menu, click on Import Email Contacts
3. Click on your email provider
4. Enter your email address and password, then click Sign In
5. Allow PropertyPulse permissions to your email contacts by clicking Agree
6. Select which contacts to import and click Next
- Click “Contacts” on the left side of the page
- Click the gear-shaped icon above your list of contacts and click “Export”
- Select “CSV” and click “Export”
- A file named “contacts.csv” will be downloaded to your computer
——————-OR—————–
1. Navigate to the Leads tab
2. On the left side menu, click on Import Email Contacts
3. Click on your email provider
4. Enter your email address and password, then click Sign In
5. Allow PropertyPulse permissions to your email contacts by clicking Agree
6. Select which contacts to import and click Next
- Find the Contacts menu in the main menu bar and select “Search for Contacts”
- Enter the search criteria for the contacts you would like to export (a contact type, for example). If you would like to export all contacts, don’t enter any search criteria.
- Click the “Search” button at the bottom of the page
- On the search results screen, select the individual contacts to export by placing a check next to each name or select all contacts by checking the box at the top of the list
- Click “Export Contacts” at the bottom of the page
- Next to “I want to export…”, choose “Selected Contacts” or “All Contacts”
- Next to “Export contacts to”, choose CSV
- Next to “Export Options”, choose one contact record and all associated items
- Click “Export”
- Once the processing is complete, a prompt will appear allowing you to save the file
- Navigate to your address book
- From the Address Book menu, click “Contacts”
- Click “Export”
- Click “Export CSV”
- In the Download dialog box, click “Save”
- If prompted, specify the folder you want to save the file in and the name of the file, and then click Save